

First the unboxing...
As stated earlier, I realized immediately that the bottles were not included and that I'd have to supply my own. What is included however...
-Barrel / keg shaped, translucent-brown, fermentor with spigot.
-Can of Pale Ale LME (Liquid Malt Extract) which is the processed equivalent of malted barley which has been mashed - turning the starches in the barley into fermentable sugar.
 -Very small packet of yeast tucked under the plastic add-on lid on top of the can of LME.
-Packet of "Booster". This is odd. On the packet, Mr. Beer proclaims that Booster will add to the alcohol percentage and the overall body of the beer. On the back of the packet one ingredient is listed... corn syrup solids. Strange. Mr. Beer seems to have a thing for corn beer.
-An instruction pamphlet.
-And a small packet of One-Step sanitizer.
Now the "How to Mr. Beer..."
Step 01: Sanitizing
 As expected, the first step is cleaning. I tell most people, "half the time you're brewing, you're cleaning. Prepare to be a part-time brewer, and a part-time hobbyist of the janitorial arts.
A ten minute soak for the keg with half of the One-Step packet in luke warm water is in order. A can opener and a stirring spoon in the sanitizer is also necessary especially since you're not going to kill any germs on either of them by boiling later... there isn't a typical boiling step involved in this weird, truncated process. Sidenote: There is no need to rinse your sanitized tools, just drip dry. It'll be fine.
It's also necessary to run the sanitizer-infused luke warm water through the spigot. The sanitizer should touch all surfaces that the pre-fermented beer will come in contact with. Be sure to sanitize the top of the fermentor lid as well.

Step 02: Warm the can of LME
Liquid Malt Extract can pour like molasses in January. It's a good idea to draw some warm to hot water and let the whole can of LME sit in a bath for ten minutes or so. This will allow you to easily pour it into your wort later.
Step 03: Add the booster to four cups of water

The booster is the first ingredient added to your brew pot (suggested 3 quart sized brew pot). The instructions tell you to pour it in very slowly to avoid clumping. They aren't lying. It clumps very easily. It looks much like plain old sugar. I guess in this case, it's plain old corn sugar.
So far the process has been very convenient and streamlined but this clumping "Booster" is proving the opposite. Eventually I decided to ignore the instructions and I moved the brew pot to the stove then fired up the burner to medium heat. This seamed to help a great deal. Soon the corn sugar was fully dissolved.
 Step 04: Add the Liquid Malt Extract
Now the sugar water is ready for the LME. I've warmed up the can and have opened it with my newly sanitized can opener. It poured very easily into the brew pot and since I've not turned the heat up to high, there is no scorching.
The instructions say to stir in the LME and then bring it to a boil. It's not suggested how long... it just says to boil. I let it go for five minutes or so and then called it quits.
Step 05: Add hot wort to partially filled fermentor
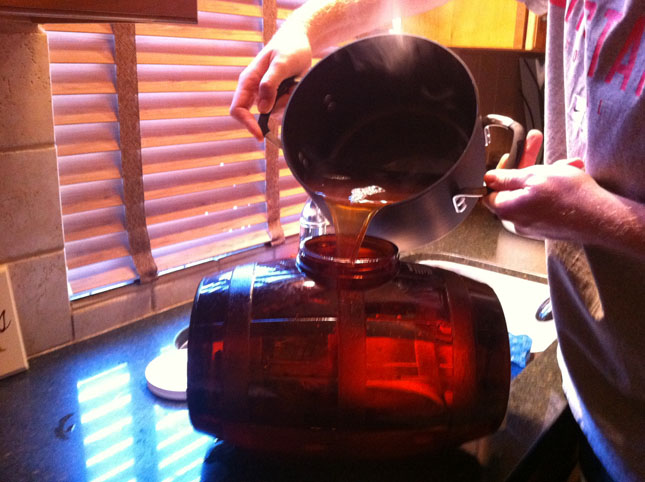 I've filled the fermentor with filtered, cold water from the dispenser on my fridge to the suggested 4 quart mark. This translucent fermentor has notches on the side which allows you to very easily hit the mark.
It's necessary not to skip this step because the boiling wort will surely cause damage to your plastic fermenter. Maybe it goes without saying but the Mr. Beer fermentor is not dishwasher safe.
Next, the wort is poured into the cool water inside the fermentor. Then the instructions call for more cool water to be added to bring the wort level inside the fermentor to 8.5 quarts.
Step 06: Add the yeast
 Almost there... time to stir. Mr. Beer says to stir vigorously before adding the yeast. Surely this is to aerate the wort since yeast needs oxygen to function properly.
Now, sprinkle in the yeast. The instructions suggest letting the yeast sit in the wort for 5 minutes and then stir vigorously one last time. This seems strange to me but I do it anyway...
Then set and forget... add the sanitized lid to the fermentor and store in a dark place for at least a week. I'll be letting it ferment for 3 weeks, but that's me... and my holiday travel schedule. (Sidenote: the top of the fermentor has small notches carved out so CO2 can escape from underneath the screwed on lid during fermentation).
At last, Mr. Beer has been conceived.
Overall it was a fairly enjoyable 45 minutes or so. The Mr. Beer process will be a strange, head-scratching experience to the typical homebrewer but not a completely foreign venture. Of course, as a brewer, you have much less, strike that... hardly any control over the outcome of the beer when using this kit. This was off-putting for me but if the final product is decent, I'll be satisfied based on the extremely small amount of foreplay Mr. Beer requires.
The Brewline: Mr. Beer is the stream-lined Cliff's Notes version of beer brewing to what otherwise would be a typically complex novel. Only time will tell if this abridged process can produce something worth drinking.

UPDATE: Twenty-Four hours later, there's not much activity inside the fermentor. Hardly any krausen to speak of at all. There are some bubbles here and there. The only sign of hope is the faint smell of newly produced alcohol that can be whiffed if I put my nose very close to the fermentor's lid. Fingers crossed.
